Create a Pre-authorized Card Payment
Process a complete two-step payment transaction by first authorizing it to reserve funds, and then capturing it to finalize the charge. This guide walks you through every step of using the Getnet Regional API for this common e-commerce flow.
Requirements
Before following the steps, you need to:
- Create your account by contacting the Integration Support team to get your API credentials
client_idandclient_secret. - Generate your token with your credentials using the Authentication endpoint.
Getnet provides a Postman Collection to help you to replicate these use cases locally. You can also test the API in sandbox using the API Reference available in the documentation.
Use Cases Specifics
When integrating any Getnet solution, market-specific requirements apply. Be sure to review the resources below before you go live:
You can also use test cards to simulate specific scenarios. More information about specific requirements for each country can be found in the Developer Resources section of the Getnet documentation.
Two-Step Payment Process
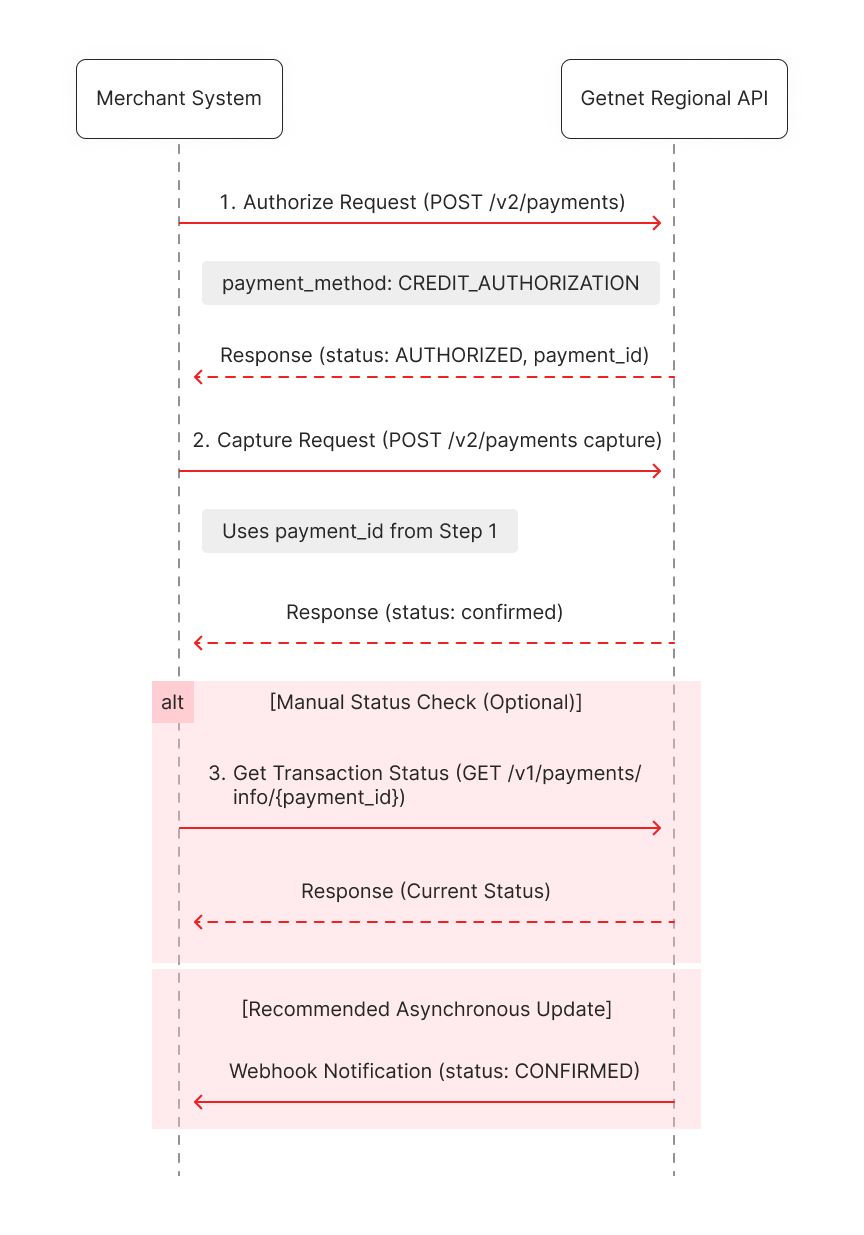
To help visualize the two-step payment process, the following sequence diagram illustrates the interactions between your system and the Getnet Regional API. It covers the initial authorization, the subsequent capture, and the two methods for verifying the final status.
Getnet also supports creating and capturing payments in one step. For more details, see the Create Single-Step Payments guide.
Tokenize Card Data (Optional)
Instead of sending the raw card number in your payment request, you can use tokenization to enhance security and reduce PCI DSS compliance scope. To use a tokenized card:
- Tokenize the card by calling the Card Tokenization endpoint with the
card_numberandcustomer_id. - In your payment request, replace the
card.numberfield withcard.number_tokenusing the token value received from the tokenization endpoint.
number_token, you must exclude the card.number property from the request. For complete details on tokenization, see the Tokenization and Vault documentation.Step 1: Authorize the Payment
A two-step payment starts with authorization. This step validates the customer's payment details and places a hold on the funds with the card issuer, but it does not transfer them yet. Use the Create - Authorize endpoint to initiate the transaction.
Some countries and card schemes impose specific pre-authorization limits, adjustment rules, and capture windows. Review the pre-authorization reference for country-by-country requirements.
data.payment.payment_method attribute in your request to CREDIT_PRE_AUTHORIZATION. This ensures the funds are only reserved and not immediately captured. The table below lists the minimum fields you need to send:| Attribute | Description | Required |
|---|---|---|
idempotency_key | Unique identifier to prevent duplicate charges. | Yes |
order_id | Merchant reference ID used for reconciliation. | Yes |
request_id | Trace identifier for idempotency audits and support follow-up. | Recommended |
data.amount | Transaction amount in cents. | Yes |
data.currency | ISO currency code used in the transaction. | Yes |
data.customer | Customer details (name, email, phone, document, full billing address). Mandatory in production to avoid antifraud blocks. | Yes |
data.payment.payment_method | Must be CREDIT_PRE_AUTHORIZATION for a two-step flow. | Yes |
data.payment.transaction_type | Defines how the transaction is processed (FULL, INSTALL_NO_INTEREST, INSTALL_WITH_INTEREST). | Yes |
data.payment.number_installments | Number of instalments (use 1 for a single payment). | Yes |
data.payment.card | Card data set (number, brand, expiration_month, expiration_year, security_code, cardholder_name). | Yes |
data.additional_data.device | Device fingerprint information (ip_address, device_id, finger_print) for antifraud analysis. | Production required |
The antifraud payload must also include the following fields:
| Object / Field | Description |
|---|---|
customer.first_name | Customer's first name |
customer.last_name | Customer's last name |
customer.email | Customer email address |
customer.phone_number | Phone number (international format) |
customer.document_type | Document type (e.g., CPF, DNI, etc.) |
customer.document_number | Document number (without punctuation) |
customer.billing_address.street | Street name |
customer.billing_address.number | Address number |
customer.billing_address.district | District or neighbourhood |
customer.billing_address.city | City |
customer.billing_address.state | State or province |
customer.billing_address.country | Country code (ISO) |
customer.billing_address.postal_code | Postal or ZIP code |
additional_data.device.ip_address | Customer’s IP address |
additional_data.device.device_id | Device fingerprint session ID (UUIDv4) |
additional_data.device.finger_print | Fingerprint hash generated by the antifraud script |
Antifraud data is mandatory for production environments. Transactions missing device fingerprint or customer information will be automatically blocked by antifraud teams to prevent fraud. See the Antifraud documentation for complete implementation details.
payment_id, which is used to identify this transaction in the next step.The following code block shows an example of a request and response to authorize a payment:
curl --request POST \
  --url https://api-sbx.globalgetnet.com/dpm/payments-gwproxy/v2/payments \
  --header 'authorization: Bearer ' \
  --header 'content-type: application/json' \
  --header 'x-seller-id: 54f88e68-7764-4e87-8830-756b1e2c02f8' \
  --header 'x-transaction-channel-entry: XX' \
  --data '{
  "idempotency_key": "63c7f8ee-51a6-470d-bb76-ef762b62bfb7",
  "request_id": "daac03dc-73db-453f-9bea-b1391669d5d3",
  "order_id": "order123",
  "data": {
    "amount": 118708,
    "currency": "BRL",
    "customer_id": "test",
    "customer": {
      "first_name": "John",
      "last_name": "Doe",
      "email": "john.doe@example.com",
      "document_type": "CPF",
      "document_number": "12345678900",
      "phone_number": "+5511999999999",
      "billing_address": {
        "street": "Av. Paulista",
        "number": "1000",
        "complement": "Apto 101",
        "district": "Bela Vista",
        "city": "São Paulo",
        "state": "SP",
        "country": "BR",
        "postal_code": "01310-100"
      }
    },
    "payment": {
      "payment_method": "CREDIT_PRE_AUTHORIZATION",
      "save_card_data": false,
      "transaction_type": "FULL",
      "number_installments": 1,
      "soft_descriptor": "LOJA*TESTE*COMPRA-123",
      "dynamic_mcc": 1799,
      "card": {
        "number": "5155901222260000",
        "expiration_month": "05",
        "expiration_year": "25",
        "cardholder_name": "CARD HOLDER",
        "security_code": "282"
      }
    },
    "additional_data": {
      "device": {
        "ip_address": "192.168.1.1",
        "device_id": "63c7f8ee-51a6-470d-bb76-ef762b62bfb7",
        "finger_print": "1a2b3c4d5e6f7g8h9i0j"
      }
    }
  }
}'curl --request POST \
--url https://api-sbx.globalgetnet.com/dpm/payments-gwproxy/v2/payments \
--header 'authorization: Bearer ' \
--header 'content-type: application/json' \
--header 'x-seller-id: 54f88e68-7764-4e87-8830-756b1e2c02f8' \
--header 'x-transaction-channel-entry: XX' \
--data '{
"idempotency_key": "63c7f8ee-51a6-470d-bb76-ef762b62bfb7",
"request_id": "daac03dc-73db-453f-9bea-b1391669d5d3",
"order_id": "order123",
"data": {
"amount": 118708,
"currency": "BRL",
"customer_id": "test",
"customer": {
"first_name": "John",
"last_name": "Doe",
"email": "john.doe@example.com",
"document_type": "CPF",
"document_number": "12345678900",
"phone_number": "+5511999999999",
"billing_address": {
"street": "Av. Paulista",
"number": "1000",
"complement": "Apto 101",
"district": "Bela Vista",
"city": "São Paulo",
"state": "SP",
"country": "BR",
"postal_code": "01310-100"
}
},
"payment": {
"payment_method": "CREDIT_PRE_AUTHORIZATION",
"save_card_data": false,
"transaction_type": "FULL",
"number_installments": 1,
"soft_descriptor": "LOJA*TESTE*COMPRA-123",
"dynamic_mcc": 1799,
"card": {
"number": "5155901222260000",
"expiration_month": "05",
"expiration_year": "25",
"cardholder_name": "CARD HOLDER",
"security_code": "282"
}
},
"additional_data": {
"device": {
"ip_address": "192.168.1.1",
"device_id": "63c7f8ee-51a6-470d-bb76-ef762b62bfb7",
"finger_print": "1a2b3c4d5e6f7g8h9i0j"
}
}
}
}'Example of response:
{
  "idempotency_key": "13c7f8ee-51a6-470d-bb76-ef762b62bfb7",
  "seller_id": "54f88e68-7764-4e87-8830-756b1e2c02f8",
  "payment_id": "d36887d0-53ec-4c36-b731-9bbeca18fcd2",
  "order_id": "123order2",
  "amount": 118708,
  "currency": "CLP",
  "status": "AUTHORIZED",
  "payment_method": "CREDIT_PRE_AUTHORIZATION",
  "received_at": "2025-08-12T20:46:26.713Z",
  "transaction_id": "MCC30105G5020",
  "original_transaction_id": "MCC30105G5020",
  "authorized_at": "2025-08-12T20:46:26.713Z",
  "reason_code": "00",
  "reason_message": "authorized",
  "acquirer": "GETNET",
  "soft_descriptor": "LOJA*TESTE*COMPRA-123",
  "brand": "MASTERCARD",
  "authorization_code": "604020",
  "acquirer_transaction_id": "204050301040206020503010"
}{
"idempotency_key": "13c7f8ee-51a6-470d-bb76-ef762b62bfb7",
"seller_id": "54f88e68-7764-4e87-8830-756b1e2c02f8",
"payment_id": "d36887d0-53ec-4c36-b731-9bbeca18fcd2",
"order_id": "123order2",
"amount": 118708,
"currency": "CLP",
"status": "AUTHORIZED",
"payment_method": "CREDIT_PRE_AUTHORIZATION",
"received_at": "2025-08-12T20:46:26.713Z",
"transaction_id": "MCC30105G5020",
"original_transaction_id": "MCC30105G5020",
"authorized_at": "2025-08-12T20:46:26.713Z",
"reason_code": "00",
"reason_message": "authorized",
"acquirer": "GETNET",
"soft_descriptor": "LOJA*TESTE*COMPRA-123",
"brand": "MASTERCARD",
"authorization_code": "604020",
"acquirer_transaction_id": "204050301040206020503010"
}Getnet provides a list of test cards that can be used in the Stage environment to simulate various transaction scenarios.
Step 2: Capture the Payment
After a successful authorization, you must capture the funds to finalize the transaction. Use the Capture endpoint to transfer the previously authorized funds to your account.
payment_id from the authorization step and the idempotency_key. If you send the amount, it must be equal to or lower than the authorized amount.status field in the response body is CAPTURED.The following code block shows an example of a request and response to capture a payment:
curl --request POST \
  --url https://api-sbx.globalgetnet.com/dpm/payments-gwproxy/v2/payments/capture \
  --header 'authorization: Bearer ' \
  --header 'content-type: application/json' \
  --data '{
  "idempotency_key": "11c7f8ee-51a6-470d-bb76-ef762b62bfb1",
  "payment_id": "a36887d0-53ec-4c36-b731-9bbeca18fcd2"
}'curl --request POST \
--url https://api-sbx.globalgetnet.com/dpm/payments-gwproxy/v2/payments/capture \
--header 'authorization: Bearer ' \
--header 'content-type: application/json' \
--data '{
"idempotency_key": "11c7f8ee-51a6-470d-bb76-ef762b62bfb1",
"payment_id": "a36887d0-53ec-4c36-b731-9bbeca18fcd2"
}'Example of response:
{
  "seller_id": "54f88e68-7764-4e87-8830-756b1e2c02f8",
  "payment_id": "d36887d0-53ec-4c36-b731-9bbeca18fcd2",
  "idempotency_key": "13c7f8ee-51a6-470d-bb76-ef762b62bfb7",
  "order_id": "123order2",
  "amount": 118708,
  "currency": "CLP",
  "status": "CAPTURED",
  "reason_code": "00",
  "reason_message": "captured",
  "captured_at": "2025-08-12T20:47:52.166Z"
}{
"seller_id": "54f88e68-7764-4e87-8830-756b1e2c02f8",
"payment_id": "d36887d0-53ec-4c36-b731-9bbeca18fcd2",
"idempotency_key": "13c7f8ee-51a6-470d-bb76-ef762b62bfb7",
"order_id": "123order2",
"amount": 118708,
"currency": "CLP",
"status": "CAPTURED",
"reason_code": "00",
"reason_message": "captured",
"captured_at": "2025-08-12T20:47:52.166Z"
}Step 3: Check the Payment Status (Optional)
AUTHORIZED. After you complete the capture step, this status will change to CAPTURED.Because some payments are processed asynchronously, the status can change over time. To get the latest status of a transaction, use the Get Transaction endpoint.
For real-time updates without polling, it is recommended to use Webhooks to receive notifications for every status change.
Next Steps
Now that you have successfully created a two-step payment, you can explore more features of the Getnet Regional API:
- Create a Single-Step Payment.
- Learn more about 3DS Payments.
On this page